CNN


Yum

Thursday, December 26, 2013

Butternut Squash Soup- Guest Blog post from A New York Foodie

Hello Everyone,
Here is my final guest blog post :-) This one is from Sandi who is A New York Foodie and A New York Foodie facebook :-) Today she is bringing you Butternut Squash Soup :-) I hope you enjoy her recipe!!! 

-Have a Very Merry Christmas Everyone,
Alyssa
Cooking From A SAHM
************************************************


I am Sandi from A New York Foodie blog and here is my Butternut Squash Soup recipe. 

The Christmas and winter seasons are upon us. There is nothing better than a warm bowl of 

soup!! Especially Butternut Squash Soup which is rich and creamy texture! This soup is low on 

fat as it’s only made with a small amount of butter, but it’s certainly not low on flavor! Enjoy!

Butternut Squash Soup

2 tbsp. light butter

1/2 large onion or 1 small, diced

2 stalks celery, diced

2 carrots, diced

1 potato, peeled and cubed

2 small-medium butternut squash

4-6 cups chicken or vegetable stock

salt and pepper, to taste

Preheat oven to 400 degrees. Cover a cookie sheet with non stick tin foil and place the squash 

on the tray. Stick it with a fork and make a few small holes for venting. Roast the squash for 

about an hour and a half to two hours until very soft. Turning occasionally. When the squash 

are done, take out of the oven and let cool.

Meanwhile melt the butter in a large non stick soup pot and cook the vegetables until lightly 

browned, about 5 minutes, stirring occasionally. Season with salt and pepper. Pour in the 

chicken stock so it covers the vegetables and bring to a boil. Cover the pot and reduce heat to 

simmer and cook for approximately 30-40 minutes until the vegetables are soft.

When the squash are cool enough to handle, peel the skin off and take out the seeds and stringy 

bits. Add it into the vegetable mixture and stir to combine. Working in batches, add the soup to 

a blender or food processor with more of the chicken stock and puree. When all of the soup is 

pureed add it back into the pot and taste to see if it needs more salt and pepper. For a thinner 

soup add more broth.

Monday, December 23, 2013

Kale Soup-Guest Post from Matthew Daniels

Hello Everyone,
Just in case your just now coming in, I'm spending this week in Il spending Christmas with my family. I decided to take a break from blogging this week. So I have arranged some guest bloggers. Today I'm bringing you a guest post from my friend Matthew Daniels. I met him and his wife doing a Food/Clothing and Toy drive. He is bringing you Kale Soup.

Happy Christmas Eve!
-Lysska
Cooking From A SAHM
******************************
I live in a city with a massive Portuguese population and everybody's mother and grandmother has their own recipe for Kale Soup — and they are all delicious.

This is my recipe that I have perfected after tinkering around. Portuguese Kale Soup has amazing flavor. It only gets better after sitting in the fridge for a day, when the flavors meld together. It's a hearty soup with stew-like properties.

Ingredients

  • 16oz frozen kale or
  • 1-2lb bunch of fresh kale washed, stemmed, and rough chopped or torn into bite sized pieces
  • 1 large yellow onion diced
  • 3/4c olive oil
  • 4-6 cloves of garlic peeled + minced
  • 8 cups of beef or pork broth
  • 1-2 lbs of Linguica (Portuguese sausage) sliced into coin sized pieces (see link to purchase)
  • 1-2 cans red kidney beans drained + rinsed
  • 3-4 russet potatoes cut into cubes
  • 1/2 box of elbow macaroni (optional)
  • 1-3 whole bay leaves
  • 1t crushed red pepper flakes or 1T of red pepper paste
  • sea salt + pepper to taste
I can't stress enough how much better it is when you use authentic LinguiƧa (pronounced Lin GWEE sah) in your soup. It's a delicious cured sausage marinated in garlic, wine and other delicious spices.
You can order it online, it's reasonably priced and made using the same recipe used for generations. I highly recommend you order this pack and try it. Linguica is delicious on pizza, with sauteed peppers and onions in a sub roll, as a side with eggs in the morning and in Kale Soup! http://www.gasparssausage.com/gasparssampler.html

Now, for the instructions.

It's only soup, so it's pretty easy to make! This soup is versatile too. You like carrots a lot? Throw in some carrots with the potatoes. Fancy sweet corn? Then throw it in. As long as you have the base ingredients that are listed above, you can pretty much add in any vegetables. You can also add in additional meats like Italian sausage, ground chuck, or salt pork if you want. It's a great soup because it's easy and you can add your favorite stuff to it.
1. Heat olive oil in heavy soup pot on medium heat, saute onions, linguica and garlic for 3-5 mins. This helps to release the fat and add flavor to the soup. Linguica is slowly smoked and cooked in a smoke house so it does'nt need to saute for a ton of time at all. Make sure to add the garlic last to keep it from browning. 
2. Once you've heated the onions garlic, linguica, and olive oil, add the 8c of broth, salt, pepper, and crushed red pepper and let it simmer for 8-10 minutes 

3. Then, add the potatoes and any additional vegetables that require an extended cooking time and continue simmering for about 20 minutes.

4. Next, you're going to add the kale, kidney beans, and optional pasta and simmer for an additional 10-15 minutes. Now, if you're grocery store carries frozen kale, don't be afraid to use it if you don't have the time or inclination to wash and pull apart fresh kale. The soup will still taste amazing .

5. At this point the potatoes have been cooking for about 30-35 mins and should be done. And that means your soup is done! Let it sit and cool on the stove top for 10-15 minutes before serving.

Serve with crusty bread or chowder crackers.

Bursting with delicious flavor, Kale soup gets even better after a day or two melding in the fridge. Oh, if your soup winds up lacking in the broth department, all you gotta do is either add some additional water or use beef boullion cubes to make broth to add to the soup.

If you have any questions, don't be afraid to head over to the Facebook page and ask. I'll hang around to answer any questions you may have.

Bom appetite!

Saturday, December 21, 2013

Candy Cane Fudge-Guest Post By Hun Whats for Dinner

Hello Everyone,
I want to Wish you all a very Merry Christmas. I'm taking this week off because I'm in Illinios with my family for Christmas. I wanted to make sure you all got some new recipes so I have gathered some people to help me out :-) Today the guest post is from Cindy aka Hun Whats for Dinner :-) She's become a good blogging friend of mine. I appreciate her helping us. Today shes bringing Candy Cane fudge!!
I hope you enjoy time spent with your Family!
-Lysska
Cooking From A SAHM
**************

Hi everyone, I'm Cindy from Hun... What's for Dinner? and I am so excited to be sharing a super easy, but gorgeous fudge recipe with you guys today. If you aren't familiar with me, or my blog, I'm a Stay at Home Mom of two, married to a Chef. My hubby doesn't really feel like cooking after being at work all day, so I'm the one in charge of meals in the house..... no pressure, LOL. I'm all about good food, that is simple and doesn't use a bunch of exotic ingredients. I'm also not opposed to opening a can, or package, if it's going to make my time in the kitchen easier. 

Today I'd like to share a fudge recipe I created last year around this time. I made it to add to my Christmas baking trays and everyone loved it. It is a very simple recipe, which is important, since I'm always so intimidated from those bakes, or cooked fudge recipes. I hope you enjoy!


Double Chocolate Candy Cane Fudge 

1 pkg. (6 squares) Baker's Semi Sweet Chocolate 
1 can (300 mL) sweetened condensed milk, divided
1 pkg. (6 squares) Baker's White Chocolate
1/3 C candy cane Hershey Kisses, chopped
1/4 C crushed candy canes, plus some for garnish
Kelley green food colour gel from Wilton (or green food colouring) 
Line an 8-inch square pan with parchment paper, with ends extending over sides. Microwave semi sweet chocolate and 2/3 cup milk in medium microwaveable bowl on medium power for 1-1/2 min. or until chocolate is almost melted, stirring after 1 min.; stir until completely melted. Add chopped Hershey Kisses and mix well. Spread onto bottom of prepared pan.
 
Microwave white chocolate, a touch of green food colouring and remaining condensed milk in separate microwaveable bowl on medium power for 1-1/2 min. or until chocolate is almost melted, stirring after 1 min.; stir until completely melted.

Stir in 1/4 C crushed candy cane pieces and spread over first chocolate layer. Sprinkle with additional crushed candy cane pieces, gently pressing them into the fudge and refrigerate 2 hours. Use paper handles to lift fudge from pan before cutting into pieces.


Thank you Lysska, for giving me the opportunity to share with your readers! I hope you are having a wonderful time with your family, this holiday season. 

Merry Christmas, Joyeux Noel, Happy Hanukkah, Feliz Navidad!!

Cindy Jamieson

Monday, December 2, 2013

Strawberry N Cream Cake with Tea Berries


Strawberry N Cream Cake with Tea Berries

I'm so excited when I got invited to work with 11 other bloggers....We are all doing the Twelve Cakes of December. Let me tell you there are some yummy looking cakes, and great bloggers behind those cakes. 


So as you'll notice in the title of this cake it say Tea Berries. Now, most of you or a lot of you will be wondering what the heck those are....They are American Winter Green berries..They use them to get the winter green extract. So that is what they are...I went in the woods to gather them from plants :-) No worries I washed them off :-)

I had originally planned on just doing the Strawberries N Cream Cake, but thought it was kind of to plain. So last night about midnight I decided to go gather tea berries to dress up the cake a bit. Who knew that Tea Berries and Strawberries...Plus whip cream go together??? This cake is awesome and tastes great....If you don't have access to tea berries don't worry...just skip them. 

Whip Cream

1 Container of Whipping Cream
3 T. Sugar
1 T. Vanilla

Whip till you can make peaks with it....Most of the time you don't want to do it to hard but actually you'll need to whip it a bit more then usual. Just so it gets stiff.  You'll be using this as the topping. Keep in the fridge till you need it. 

Strawberries
1/2 C. Diced Strawberries

Put them in the fridge till you need them as well. 

Cake:

1. C Butter
1 C. Sugar
4 Eggs
2 T. Warm Water
1/2 Tsp Vanilla
1 Tsp Cinnamon
2. C Cake Flour
2 Tsp Baking Powder
1/4 Tsp Salt

In a mixing bowl combine your room temp butter, and your sugar. Mix for about 5 minutes. Add eggs one at a time beating after each egg. Add your warm water, vanilla and cinnamon. Mix...Then add your cake flour, baking powder and salt. Beat for 15 minutes till it becomes shiny.  Grease two round cake pans. Split the batter between both pans. Preheat oven to 350. Put the cakes in the oven for about half hour but check it....When it becomes golden brown and stick a tooth pick in it. If it comes out clean it's done. Take them out and let them cool. Once they have cooled off you'll want to take them out of their pan. You'll need to make the cakes each into two cakes.  On a flat dish lay the bottom piece out very carefully. Spread whip cream on it and top with some of your diced strawberries. Keep doing this till you got to the top. Place the last cake piece VERY carefully on top. Take the rest of your whip cream and top the cake and around the sides with the whip cream. Which is WHY I said STIFF...:-) Once you have the cake all pretty and white then you can decorate the top with strawberries. Also top with the Tea Berries if you wish. Refrigerate till you wanna eat it :-)
December 1st - Libby  Lemony Thyme Chocolate Truffle Pirouette Cake
December 2nd - Lysska  Cooking from a SAHM -Strawberry N Cream Cake with Tea Berries
December 3rd  Nettie  Moore or Less Cooking
December 4th Lynne  365 Days of Baking & More
December 5th  Becca  Cooking with Chef Bec ~ It’s Yummi
December 6th  Lorinda  The Rowdy Baker
December 7th  Cindy  Hun…What’s for Dinner?
December 8th  Joan  Chocolate, Chocolate and more
December 9th  Abby Manila Spoon
December 10th  Karen  Baking in a Tornado
December 11th  Amy  Crumbs in my Mustachio
December 12th  Cydnee Tampa Cake Girl


Sunday, November 24, 2013

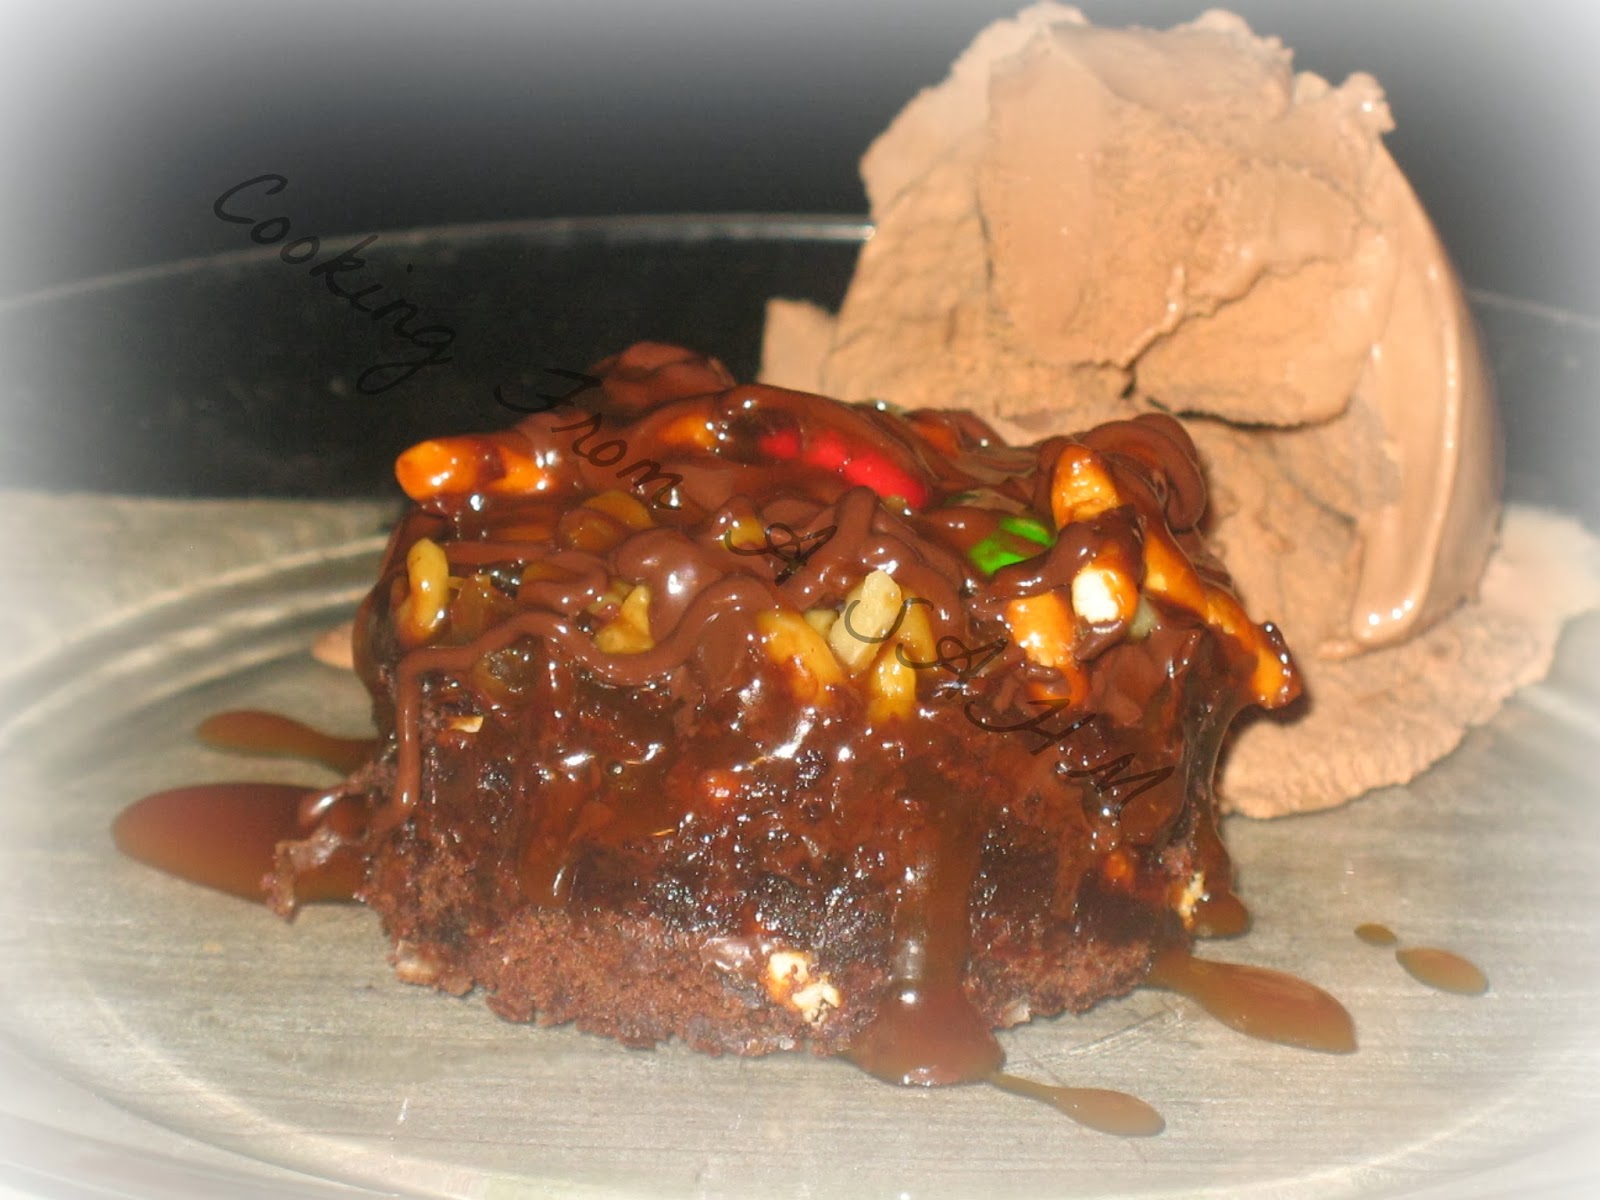
Chocolate Caramel Brownie Pie


Good Morning Everyone,
I'm bringing to you a Chocolate Caramel Pie....It is sooo good. It's topped with pretzels, m&ms and lots more....Check out the recipe down below :-)

1 Box of Favorite Brownie Mix
1 Bag of Pretzels Chopped
1 C. Sweetened Coconut
1 C. M&Ms
1 C. Walnuts
1 Bag of Dark Chocolate Chips

Make your salted caramel sauce first(or you could just buy it and its fine. However I love the salted caramel sauce above.)
Bake your brownies as directed after your salted caramel sauce is finished. Pour the brownie batter into a round pie plate. After your brownies are done then take it out to cool. Once your brownies have cooled off as well as your salted caramel then you can begin the next step. Take a butter knife and make slits all over your brownie. Then take a spoon and pour about a half cup of caramel over the top of the brownies.Add more if it soaks up more. Then add your walnuts, m&ms, coconut and pretzels. Then take and melt the whole bag of dark chocolate. Pour into a small baggy and cut the corner off. Drizzle over the top of the brownies.  Then last but not least ENJOY!!!! Serve it with ice cream or just eat it with a spoon!!! You'll love this!! 

Tuesday, November 19, 2013

Love with Food Special Promotion


* I am NOT getting paid to advertise this. I have chosen to review and post of my own choosing*

I just love being a food blogger sometimes, because I will get stuff in the mail to review...and usually its edible stuff :-) Love With Food has been working with me since the almost beginning of my blog. You sign up for it and get a box of goodies each month. Now when you send your money each month you'll be donating a meal to those who need it. Plus guess what? This month if you subscribe for 6 or 12 months they will give you a 2 YEAR subscription to Rachel Rays magazine. That is not all though!!! By using the code FESTIVE2013  you will get 5 dollars off your subscription!! This box comes to your house every month and its 10 dollars a month

Love with Food is a neat thing....This is my second box to review and I love it. They provide healthy snacks in there. So not only will you be getting free snacks in the mail, but you'll be helping to provide a meal for those in need!!

Monday, November 18, 2013

Brown Sugar and Oat Butter Nut Squash


Good Afternoon Everyone,

Yesterday I made a mini thanksgiving for my family.....it was fun. Here is one of the side dishes I made. Everyone loved it.

2-3 C. Mashed Butternut squash
1 C. Brown Sugar
1/2 C Oats.
Swirl of Maple Syrup

Pour squash into a dish, then top it with your brown sugar and oats. Top with a swirl of Maple Syrup.  Bake at 350 till its golden and bubbling.